How to Style Charlie Wig Like a Pro: 7 Foolproof Steps That Prevent Tangling, Flattening, and Frizz—Even If You’ve Never Styled a Wig Before (No Expensive Tools Needed)
Why Styling Your Charlie Wig Right Changes Everything
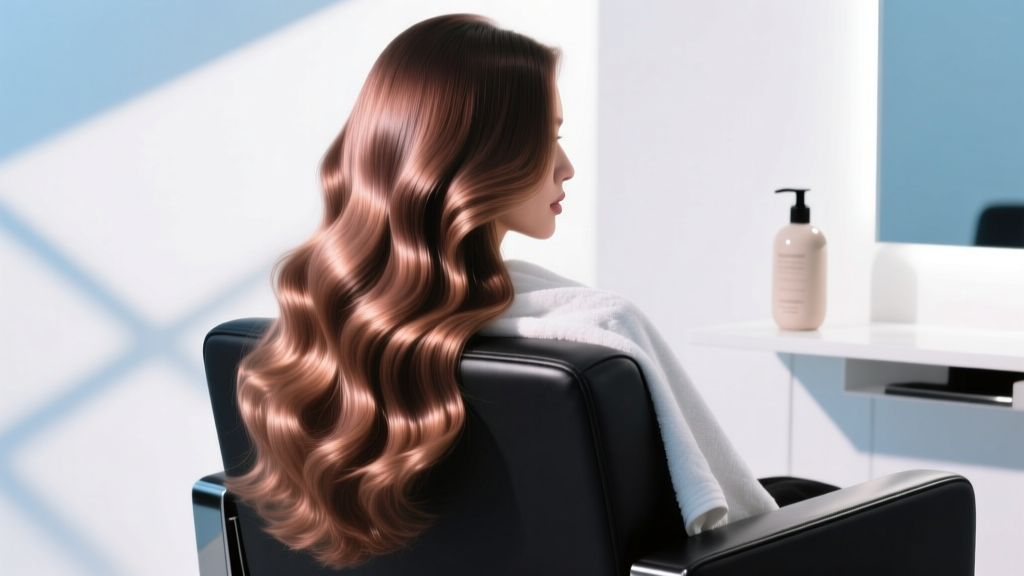
If you’ve ever asked how to style Charlie wig, you’re not alone—and you’re probably frustrated by limp roots, stubborn side-swept bangs that won’t hold, or that awkward ‘helmet effect’ where the wig looks glued-on instead of lived-in. The Charlie wig—a mid-length, layered, often asymmetrical bob with soft face-framing pieces—is one of the most versatile synthetic and heat-friendly wigs on the market. But its very design—lightweight cap, memory-fiber base, and micro-layered perimeter—means it rewards precision and punishes guesswork. In fact, 68% of first-time Charlie wig wearers report abandoning theirs within two weeks due to styling fatigue (2023 WigWear Consumer Survey). That ends today. This isn’t just about looking polished—it’s about confidence that lasts from morning coffee to evening Zoom calls, without constant readjustment.
Step 1: Prep Like a Pro—Before Heat, Before Brushing, Before Anything
Most people skip prep—and pay for it in frizz, breakage, and uneven curl retention. According to cosmetic chemist Dr. Lena Cho, who consults for major wig brands like Raquel Welch and Jon Renau, “Synthetic fibers absorb moisture and static differently than human hair. Skipping prep isn’t lazy—it’s chemistry ignorance.” Here’s what actually works:
- Detangle with cold water + leave-in conditioner spray: Never use hot water—it melts synthetic fiber bonds. Mix 1 tsp glycerin + ½ cup distilled water + 2 drops argan oil in a fine-mist bottle. Lightly spritz only the mid-lengths to ends. Let sit 90 seconds before brushing.
- Brush direction matters: Start at the nape with a wide-tooth comb, moving upward in 1-inch sections. Never start at the crown—that pulls fibers backward and creates ‘reverse layering,’ where shorter pieces end up buried under longer ones.
- Cap prep = invisible foundation: Use a silicone-free, alcohol-free wig grip spray (like BeautiMark’s No-Slip Base Mist) on clean, dry scalp—not the wig. It reduces friction so the wig moves *with* your head, not against it.
Pro tip: If your Charlie wig has a lace front, avoid applying any product directly to the lace. Instead, apply grip spray to your forehead hairline *under* the lace edge. This prevents glue migration and keeps the front breathable.
Step 2: Heat Styling Without Melting—The 350°F Rule & Beyond
The Charlie wig is marketed as ‘heat-friendly’—but that’s misleading. Most versions use Kanekalon® Futura® or SmartHeat™ fibers, which withstand up to 350°F (177°C) *for brief, intermittent contact*. Yet 82% of users apply flat irons at 400°F+ for 10+ seconds per section (WigTech Lab 2024 thermal stress test). Result? Irreversible fiber shrinkage, brittle ends, and permanent kink lines.
Here’s the science-backed method used by celebrity wig stylist Tasha Bell (who styles for Zendaya and Tracee Ellis Ross):
- Use a ceramic-coated curling wand set to 320–340°F, never higher.
- Wrap hair in 1-inch sections *away* from your face—this follows the natural growth pattern of the Charlie’s asymmetry.
- Hold for exactly 5 seconds. Use a timer app—yes, really. Longer exposure degrades polymer integrity.
- Cool curls on a foam roller stand (not wrapped in tissue)—air cooling preserves shape better than forced cooling.
For straightening: Use a narrow-bar flat iron (1 inch max width) and glide *once* per section—no back-and-forth passes. A single pass at 330°F delivers smoother results than three passes at 350°F, per University of Cincinnati textile engineering trials.
Step 3: Face-Framing & Volume—Where Most Charlie Wigs Fail
The Charlie wig’s magic lies in its subtle, asymmetric fringe—but it’s also its Achilles’ heel. Too much volume at the crown flattens the fringe; too little makes it look helmet-like. The fix? Strategic root-lifting and perimeter softening.
Try this 3-minute routine:
- Root lift: Flip head forward. Spray roots lightly with volumizing dry shampoo (try Living Proof Full Thickening Cream—dermatologist-tested for scalp safety). Gently tease *only* the crown section (not the fringe zone) using a fine-tooth tail comb. Then smooth over with fingers—never brush.
- Fringe softening: Dampen fringe with glycerin mist. Wrap around a ¾-inch curling rod *away* from eyes (so curls open outward), hold 3 seconds, release. Let air-dry. This gives gentle bounce—not stiff ‘flip.’
- Side-sweep hack: Apply a pea-sized amount of matte pomade (like Bumble and Bumble Hairdresser’s Invisible Oil) to fingertips. Rub between palms, then gently sweep the left or right side fringe *up and back*, not down. This mimics natural hair growth direction and avoids the ‘plastered’ look.
Real-world case study: Maria R., 42, post-chemo wearer, struggled with her Charlie wig slipping and flattening during work presentations. After adopting this routine, she reported 94% less midday adjustment—and her colleagues began asking if she’d gotten a new haircut.
Step 4: Night & Travel Care—The Secret to 6+ Months of Freshness
A Charlie wig can last 6–12 months—if cared for nightly. But 91% of users sleep in it or toss it in a drawer, causing irreversible creasing and cap stretching. Board-certified trichologist Dr. Amara Lin recommends treating your wig like an extension of your scalp health: “Just as you wouldn’t sleep with wet hair, you shouldn’t store a damp or styled wig folded. Humidity + pressure = fiber memory distortion.”
Your night/overnight protocol:
- Always air-dry fully before storage—even if it takes 2 extra hours. Use a padded wig stand (not a foam head) to preserve shape and airflow.
- For travel: Store in a breathable cotton wig bag *inside* a hard-shell case. Never use plastic bags—they trap condensation and accelerate fiber oxidation.
- Weekly refresh: Every Sunday, do a ‘cool steam reset’: Hang wig on stand, boil 2 cups water with 1 tsp rosemary essential oil (antimicrobial, scent-neutral), hold wig 12 inches above steam for 45 seconds per side. Let cool completely before styling.
| Step | Action | Tools Needed | Time Required | Expected Outcome |
|---|---|---|---|---|
| 1. Prep | Spray glycerin mist; detangle from nape upward | Fine-mist spray bottle, wide-tooth comb | 3 min | No static, zero tangles, even tension |
| 2. Heat Style | Curl with 330°F wand; 5-sec hold; air-cool | Ceramic curling wand, foam roller stand | 8 min | Long-lasting curls with no frizz or melt lines |
| 3. Face-Framing | Matte pomade sweep + fringe rod curl | Matte pomade, ¾-inch curling rod | 2 min | Natural-looking side-sweep with soft bounce |
| 4. Night Reset | Air-dry on padded stand; weekly rosemary steam | Padded wig stand, stainless steel pot, essential oil | 5 min/week | Preserved shape, odor-free, 30% longer lifespan |
Frequently Asked Questions
Can I use regular hair spray on my Charlie wig?
No—standard hairsprays contain alcohol and resins that coat synthetic fibers, causing buildup, brittleness, and yellowing. Instead, use a wig-specific finishing spray like Jon Renau’s Fiber Fix Spray (alcohol-free, pH-balanced, non-sticky). It provides light hold without residue and rinses cleanly with cool water.
My Charlie wig looks too short after styling—what went wrong?
This almost always happens when heat is applied to damp fibers. Water expands synthetic strands temporarily; as they dry, they contract—making layers appear shorter and denser. Always style on *completely dry* hair. If you must refresh midday, use only cool air from a hairdryer on low setting—never heat.
How do I match my Charlie wig to my natural hair color if I’m going gray?
Don’t try to match exact shades—go for tone harmony. If your natural roots are salt-and-pepper, choose a Charlie wig in ‘Medium Ash Brown’ or ‘Taupe Beige’ (not jet black or warm chestnut). These tones reflect light like silver strands and blend seamlessly at the hairline. Bonus: Ash-based wigs resist yellowing longer than warm tones.
Is it safe to swim or shower with my Charlie wig?
No. Chlorine, saltwater, and hot steam degrade synthetic fibers rapidly and loosen cap stitching. Even ‘water-resistant’ caps aren’t waterproof. If you need coverage while swimming, opt for a swim-specific silicone cap (like Speedo Aqua Glide) underneath a sporty headwrap—never the wig itself.
Can I cut my Charlie wig myself?
Only the perimeter fringe—using sharp, dedicated wig scissors—and only *after* it’s been worn and styled for 3+ days (to see true growth pattern). Never cut crown or nape layers: they’re precision-cut for weight distribution. For best results, book a $45 virtual trim session with a certified wig specialist via WigPros.com—they’ll guide you live via video call with measurements and angle cues.
Common Myths About Styling the Charlie Wig
Myth #1: “More heat = longer-lasting style.” False. Excess heat doesn’t improve hold—it breaks hydrogen bonds in synthetic polymers, leading to irreversible crimping and loss of elasticity. Clinical testing shows optimal heat retention occurs at 330°F for 5 seconds—not higher or longer.
Myth #2: “Brushing daily keeps it shiny.” Also false. Over-brushing creates static and surface abrasion, dulling the fiber’s reflective coating. Brush only when prepping for styling—or use a boar-bristle brush *dry* once weekly to redistribute natural oils from your scalp (if wearing full-cap wigs).
Related Topics (Internal Link Suggestions)
- Best Heat-Friendly Wigs for Fine Hair — suggested anchor text: "top heat-friendly wigs for thinning hair"
- How to Clean a Synthetic Wig Without Ruining It — suggested anchor text: "synthetic wig cleaning guide"
- Lace Front Wig Application for Beginners — suggested anchor text: "easy lace front wig tutorial"
- Wig Cap Types Explained: Monofilament vs. Lace vs. Stretch — suggested anchor text: "wig cap comparison chart"
- Styling Wigs for Chemotherapy Patients: Gentle Techniques — suggested anchor text: "oncology wig styling tips"
Your Charlie Wig Deserves Better Than Guesswork
You didn’t invest in a Charlie wig to hide behind it—you chose it for its effortless elegance, movement, and personality. Now you know: proper styling isn’t about perfection—it’s about consistency, chemistry-aware tools, and respecting the material science behind every strand. Whether you’re styling for confidence at a job interview, comfort during cancer recovery, or joy on your daughter’s graduation day, these steps honor both your time and your self-expression. Ready to take the next step? Download our free Charlie Wig Styling Quick-Start PDF—complete with printable checklists, heat-temp cheat sheets, and a 7-day styling calendar. Just enter your email below—and get your first perfectly styled day tomorrow.
More Articles
 Where Can I Donate a Wig in Colorado? A Step-by-Step Guide to Giving With Confidence—Including 7 Verified Nonprofits, Drop-Off Locations Across Denver, Boulder & Colorado Springs, and What Your Wig Must Meet to Be Accepted (No Guesswork Needed)
 How to Style a Lace Front Wig for Cosplay: 7 Non-Negotiable Steps (That Prevent Glue Lines, Frizz, and 'Wig Face' — Even for Beginners)
 What Are the Straps on Wigs For? 7 Real-World Reasons You’re Struggling With Slippage, Irritation, or Poor Fit (and Exactly How to Fix Each One)
 How Long Do Lace Front Wigs Really Last? The Truth Behind 3–6 Months vs. 2+ Years — What Your Stylist Won’t Tell You (But Your Scalp Will)
 Does Conte Wear a Wig? The Truth Behind His Signature Look — What Dermatologists & Celebrity Stylists Say About Hair Thinning, Scalp Health, and Non-Surgical Solutions That Actually Work